

Making a sourdough bread bowl at home combines the rustic charm of artisan baking with the comfort of a hearty meal. These bread bowls are perfect for soups, stews, or even a creative twist on serving dips. In this article, you’ll learn everything from crafting a healthy sourdough starter to baking a hollow loaf that’s just the right consistency for holding your favorite fillings. Whether you’re a baking enthusiast or a first-time sourdough maker, you’ll find tips, tricks, and step-by-step guidance to achieve bakery-worthy results right in your kitchen.
Table of Contents
Part 1: Understanding Sourdough Bread Bowls
What is a Sourdough Bread Bowl?
A sourdough bread bowl is more than just bread; it’s a culinary experience where a round loaf is hollowed out to create an edible container. These bowls have a chewy crust that holds up against warm, liquid-based fillings like soups or chowders. To add variety to your meal ideas, try this creamy Parmesan Italian sausage soup, a perfect pairing for your sourdough creation.
Unlike plain bread, sourdough bread bowls are designed to complement your meals. Their sturdy structure makes them functional, while their rich, slightly sour taste elevates the dining experience. Best of all, you can eat the bowl after enjoying your meal!
History of Bread Bowls and Their Culinary Use
Bread bowls trace their origins to European peasant cooking, where they were a practical solution for holding soups and stews. Over time, this innovative use of bread gained popularity in restaurants and bakeries. For inspiration, explore this vegetarian soup dumplings recipe guide for unique filling ideas.
Sourdough specifically adds an artisan twist to this traditional idea. The long fermentation process used to make sourdough creates a bread that’s flavorful, digestible, and naturally preserved. Plus, its firm crust is perfect for holding even the heartiest of stews.
Why Sourdough is the Perfect Choice for Bread Bowls
Why sourdough? For one, the fermentation process produces a loaf with excellent texture and strength. The tangy flavor also pairs beautifully with savory fillings like chili or creamy tomato soup.
Sourdough’s natural fermentation makes it easier to digest compared to other types of bread. Its crusty exterior ensures the bowl doesn’t turn soggy too quickly, while the soft, flavorful interior soaks up every last bit of soup.
In the next part, we’ll cover the essential tools and ingredients you need to get started. Spoiler alert: You don’t need fancy equipment—just a little patience and the right know-how!
Part 2: Essential Ingredients and Tools for Sourdough Bread Bowls
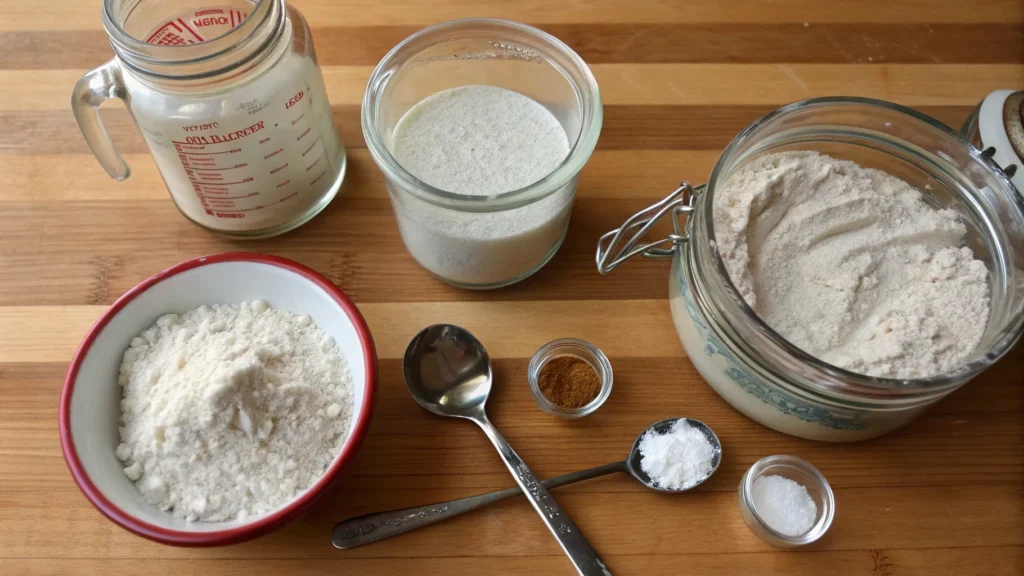
Key Ingredients for Sourdough Bread Bowls
To master how to make a sourdough bread bowl at home, you’ll need just a few basic ingredients:
- Flour: Use unbleached bread flour for the best structure, though all-purpose flour can work in a pinch.
- Water: Filtered or bottled water ensures no chlorine interferes with fermentation.
- Salt: Fine sea salt enhances the flavor without overpowering the natural tang of the sourdough.
- Sourdough starter: This is the heart of your bread bowl. A healthy starter provides the natural yeast and bacteria needed for fermentation.
Optional additions, like a touch of olive oil or honey, can slightly adjust the texture and taste, but the classic recipe keeps it simple.
Choosing the Right Sourdough Starter
Your sourdough starter is critical for success. A bubbly, active starter ensures your dough rises properly and develops that signature tangy flavor. If you don’t already have one, you can create a starter using equal parts flour and water, “feeding” it daily until it becomes active. Store-bought starters are also an option for beginners.
Look for these signs of a healthy starter:
- A bubbly surface with a mild, tangy aroma.
- Doubling in size a few hours after feeding.
Tools You’ll Need to Make Sourdough Bread Bowls at Home
You don’t need professional equipment to succeed. Gather these essentials:
- Mixing bowls: Large enough to handle your dough during fermentation.
- Bench scraper: Useful for shaping and handling sticky dough.
- Dutch oven or baking stone: These help create the perfect crust.
- Kitchen scale: For precise ingredient measurements, which are critical in sourdough baking.
With these tools and ingredients ready, you’re set to start your sourdough adventure. In the next part, we’ll cover how to prepare your sourdough starter for bread bowl success.
Part 3: Preparing the Sourdough Starter
How to Activate Your Sourdough Starter
Before diving into how to make a sourdough bread bowl at home, you’ll need an active starter. If yours has been stored in the fridge, bring it to room temperature. Feed it with equal parts flour and water (by weight) and let it sit in a warm spot for 4–6 hours.
It’s ready to use when:
- It doubles in size.
- It has a bubbly surface and a pleasant, slightly sour aroma.
Best Practices for a Healthy Sourdough Starter
Keeping your starter healthy ensures consistent results. Follow these tips:
- Feed it regularly: Daily feedings at room temperature or weekly if refrigerated.
- Use the right flour: Whole wheat or rye flour boosts activity due to its higher nutrient content.
- Avoid contamination: Always use clean utensils and keep your starter covered to prevent mold or unwanted bacteria.
Troubleshooting Common Starter Issues
If your starter isn’t bubbling or rising, don’t panic. Here’s what to do:
- Too sluggish? Move it to a warmer spot, ideally 75–80°F.
- Smells off? Discard half, feed it fresh flour and water, and monitor its progress.
- Too watery or dry? Adjust the feeding ratio slightly to maintain a pancake batter-like consistency.
With a vibrant, active starter, you’re ready to mix and knead your dough. Next, we’ll guide you through every step of creating sourdough bread bowls!
Part 4: Step-by-Step Guide to Making Sourdough Bread Bowls
Mixing the Dough: Tips and Techniques
The first step in how to make a sourdough bread bowl at home is mixing the dough. Combine your flour, water, sourdough starter, and salt in a large mixing bowl. Use a spoon or your hands to bring the dough together until no dry bits remain. If the dough feels too dry, add a teaspoon of water at a time until it’s fully hydrated.
For best results:
- Use a kitchen scale for precise measurements.
- Incorporate an autolyse step by letting the flour and water sit for 30 minutes before adding salt and starter. This boosts gluten development.
First Rise: How Long and Why It Matters
Let your dough rise at room temperature for 6–8 hours, or until it doubles in size. Cover the bowl with a damp towel to prevent drying out. This step allows the natural fermentation process to create air pockets, which make the bread fluffy and light.
Keep an eye on environmental conditions:
- If your kitchen is cool, fermentation may take longer.
- Warm spots (around 75–80°F) speed up the process.
Shaping Your Bread Bowls
Once the dough has risen, divide it into equal portions (about 200–250 grams each). Shape each portion into a round by gently stretching the dough edges toward the center and pinching them to seal. Flip the dough seam-side down and tighten the shape with a circular motion.
Second Rise and Final Preparations
Place the shaped dough rounds onto a parchment-lined tray or into bannetons for a second rise, about 1–2 hours. Cover them to avoid drying out. When ready to bake, the dough should feel puffy but hold its shape when lightly poked.
Baking the Perfect Sourdough Bread Bowl
Preheat your oven to 450°F (232°C) with a Dutch oven or baking stone inside. Transfer your dough into the hot surface and bake for 20 minutes covered, then an additional 15–20 minutes uncovered until the crust is golden brown.
For a crispy crust, add steam to the oven by placing a tray of water on the bottom rack during baking.
Suggestion: For a delicious soup to pair with these bread bowls, check out this creamy Parmesan Italian sausage soup recipe.
Part 5: Creative Ways to Use Sourdough Bread Bowls
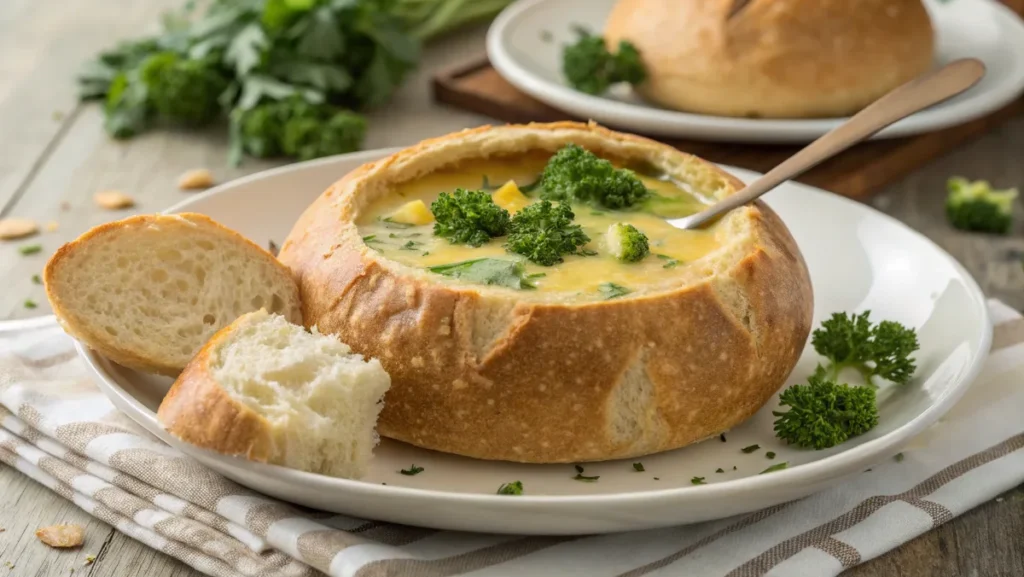
Perfect Soups and Stews to Serve in Bread Bowls
Sourdough bread bowls shine when paired with hearty soups and stews. Classic options include creamy tomato soup, clam chowder, and broccoli cheddar soup. The tangy sourdough complements the rich, savory flavors, while the sturdy crust holds everything in place. Pair with roasted red pepper gouda soup for a comforting combination.
Alternative Fillings for Sourdough Bread Bowls
Bread bowls aren’t just for soup! Try these ideas:
- Chili: Spicy, meaty, and perfect for game day.
- Mac and Cheese: A fun and indulgent twist for comfort food lovers.
- Spinach Artichoke Dip: Great for sharing at parties.
For more creative filling ideas, explore the vegetarian soup dumplings guide. These recipes pair wonderfully with your homemade sourdough bread bowls.
Part 6: Tips for Storing and Reheating Sourdough Bread Bowls
How to Store Bread Bowls Without Losing Freshness
Once you’ve mastered how to make a sourdough bread bowl at home, proper storage is key to preserving their texture and flavor. Allow the bread bowls to cool completely before storing to avoid trapping moisture, which can make the crust soggy.
For short-term storage:
- Place the bread bowls in an airtight container or wrap them tightly in plastic wrap. They’ll stay fresh at room temperature for up to 2 days.
For longer storage:
- Freeze the bread bowls by wrapping them in plastic wrap and then aluminum foil. They’ll keep in the freezer for up to 3 months.
Reheating Techniques for Best Results
Reheating sourdough bread bowls ensures they regain their crisp crust and soft interior. Here’s how:
- Preheat your oven to 350°F (175°C).
- Place the bread bowls directly on the oven rack and heat for 8–10 minutes.
- For frozen bowls, allow them to thaw at room temperature before reheating.
These simple steps will make your sourdough bread bowls taste as good as fresh! Explore the best soup bone recipes for inspiration on creating complementary broths.
Part 7: Frequently Asked Questions
What is the Best Bowl for Sourdough Bread?
The best bowl for sourdough bread is a banneton proofing basket. These bowls, typically made of rattan or wood pulp, support the dough during proofing, allowing it to rise evenly while maintaining shape. The ridges in the basket create a beautiful pattern on the crust, giving your bread a professional finish.
If you don’t have a banneton, other options include:
- A mixing bowl lined with a floured kitchen towel.
- Glass or ceramic bowls that are smooth and non-reactive.
Do You Need a Special Bowl for Sourdough Bread?
You don’t strictly need a special bowl, but using a proofing basket or a well-chosen bowl improves the final result. Proofing bowls prevent the dough from spreading out, especially for high-hydration sourdough recipes. Additionally, they help create the desired round shape and provide support for optimal rising.
What is a Sourdough Bread Bowl Called?
The term “sourdough bread bowl” typically refers to a round loaf of sourdough bread that’s hollowed out to hold soups, stews, or dips. While it doesn’t have a unique name, the concept is widely recognized as a functional and delicious serving vessel.
Are Panera Bread Bowls Sourdough?
Yes, Panera Bread bowls are made from sourdough bread. These bowls are crafted to have a sturdy crust that holds liquid fillings like soups while maintaining a soft, chewy interior.
For homemade bread bowls, check out a guide to how to make a sourdough bread bowl at home. It’s a fun and rewarding baking project!
How Do I Adjust the Recipe for Gluten-Free or Whole Wheat Sourdough?
If you need a gluten-free version, use a gluten-free sourdough starter and substitute with gluten-free bread flour. Keep in mind, gluten-free doughs are often wetter and require different handling. For whole wheat, mix half whole wheat flour with bread flour to retain structure while adding a nutty flavor.
For more helpful baking tips and tricks, explore this guide to gluten-free pumpkin bread. Whether you’re trying new recipes or perfecting sourdough bread bowls, these insights will make your baking journey easier!
Part 8: Conclusion
Learning how to make a sourdough bread bowl at home is a rewarding experience that brings together the art of bread-making and the joy of sharing hearty meals. From creating a robust sourdough starter to baking the perfect crusty bowl, every step adds to the charm of this homemade masterpiece. Not only do these bread bowls serve as functional and delicious containers for soups and stews, but they also elevate everyday dining into something memorable.
Whether you’re enjoying creamy clam chowder, spicy chili, or a cheesy spinach dip, a sourdough bread bowl pairs perfectly with your favorite fillings. Plus, the satisfaction of baking from scratch makes each bite even more special. With proper storage and reheating tips, your bread bowls can remain fresh and ready for any occasion.
Now, it’s time to get into the kitchen, roll up your sleeves, and bring this recipe to life. Happy baking!
2 thoughts on “How to Make a Sourdough Bread Bowl at Home”