

When it comes to desserts that are easy, delicious, and always a crowd-pleaser, nothing beats a homemade peach pie. However, peeling and slicing fresh peaches can take forever, and let’s face it—not everyone has the time. That’s where canned peaches come in! In this guide, you’ll discover how to make the easiest canned peach pie at home—perfect for busy days or whenever fresh peaches aren’t available.
With a few simple ingredients and straightforward steps, you can create a dessert that’s not only quick but also irresistible. Furthermore, this recipe is designed for everyone—from beginners to experienced bakers looking for a shortcut. So, grab your apron, preheat the oven, and let’s dive into the sweet world of peach pie!
Table of Contents
Part 1: Why Choose Canned Peaches for Your Pie?
Benefits of Using Canned Peaches
Life gets hectic sometimes, doesn’t it? This is exactly why how to make the easiest canned peach pie at home starts with canned peaches. These little gems are peeled, sliced, and ready to go, saving you tons of prep time. Moreover, they’re consistent in quality, which means no surprises—unlike fresh peaches that might be overripe or too firm.
In addition, canned peaches are available all year round, letting you bring a hint of summer to your kitchen even in the dead of winter. Not to mention, there’s zero waste—every slice is perfect and ready for the pie.
Nutritional Value of Canned Peaches
Surprise! Canned peaches aren’t just a shortcut—they’re also pretty good for you. Thanks to modern canning techniques, these peaches retain most of their vitamins, like Vitamin C and A, and are a decent source of dietary fiber. Just make sure to check the label for added sugars if you’re keeping an eye on your sweet intake.
For folks watching their sugar, you can always rinse the peaches under cold water before using them. It’s a quick trick that cuts down the syrupy sweetness but keeps all the peachy goodness.
Part 2: Ingredients You’ll Need for a Quick and Easy Canned Peach Pie
Essential Ingredients
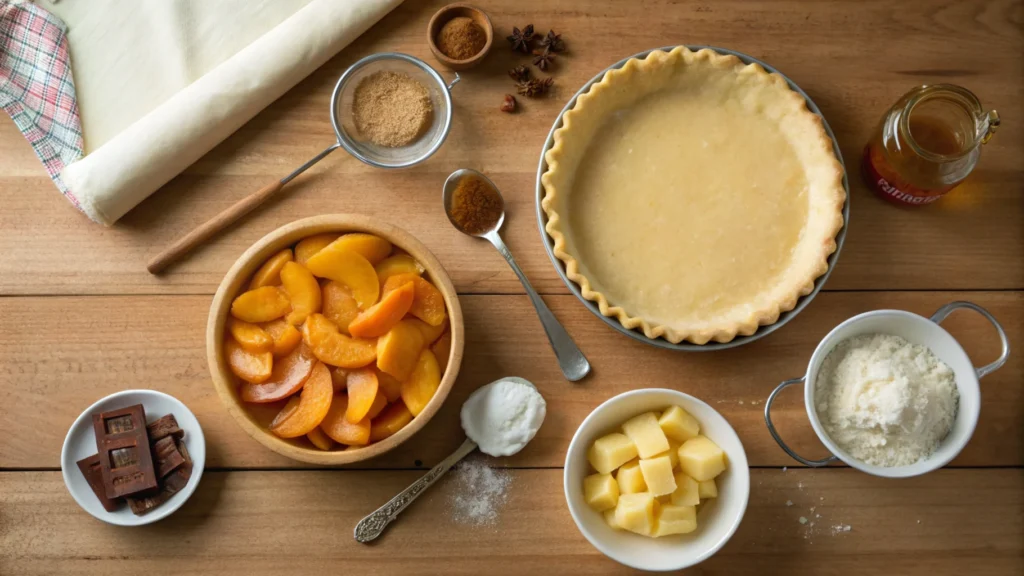
To master how to make the easiest canned peach pie at home, start with these key ingredients:
- Canned Peaches (1 can, 15-20 ounces): These are the heart of this recipe.
- Pie Crust: Store-bought or homemade, your choice!
- Sugar (½ cup): Adjust based on how sweet your canned peaches are.
- Flour or Cornstarch (2 tablespoons): This thickens the filling and prevents runniness.
- Cinnamon (1 teaspoon): Adds warmth and depth.
- Nutmeg (½ teaspoon, optional): Gives a cozy, nutty touch.
- Butter (2 tablespoons): Richens the filling beautifully.
Optional Add-Ons for Extra Flavor
Feeling creative? Here are some extras that can make your pie shine:
- Vanilla Extract: A teaspoon will elevate the filling’s flavor.
- Brown Sugar: Sprinkle some on the crust for a caramelized finish.
- Lemon Juice: A squeeze can balance the sweetness, especially if your peaches are in heavy syrup.
These ingredients are versatile, and if you’re wondering about desserts beyond pie, The Ultimate Guide: What Else Can You Do With A Ninja Creami? has tips for transforming peaches into creamy frozen treats!
Part 3: Step-by-Step Guide to Making the Easiest Canned Peach Pie
Preparing Your Ingredients
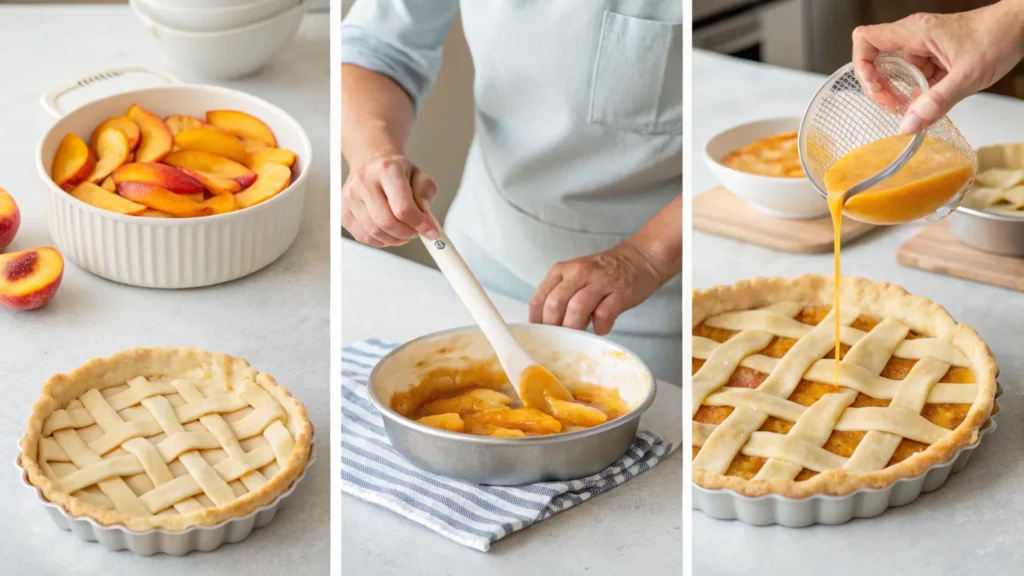
Start by draining your canned peaches thoroughly. If they’re packed in heavy syrup, give them a quick rinse to reduce the sweetness. Preheat your oven to 375°F (190°C) and get your pie dish ready by lining it with your bottom crust. If you’re making a lattice top, roll out the second crust and cut it into strips.
Crafting the Perfect Pie Filling
In a large mixing bowl, combine your peaches, sugar, flour or cornstarch, cinnamon, and nutmeg. Stir gently to coat the peaches evenly. If you’re adding vanilla extract, mix it in now for a delightful aroma. This step is key to achieving a filling that’s flavorful and perfectly thickened.
Assembling the Pie
- Pour the peach filling into the prepared crust, spreading it out evenly.
- Dot the filling with small chunks of butter for added richness.
- If you’re using a lattice top, lay the strips over the filling in a crisscross pattern. Crimp the edges to seal the crust.
Baking Instructions
Brush the crust with a light egg wash (1 beaten egg with a splash of water) to give it a golden sheen. Bake the pie in the preheated oven for 40-45 minutes until the crust is golden brown and the filling is bubbling. To avoid a messy oven, place the pie dish on a baking sheet.
Part 4: Tips for the Perfect Canned Peach Pie
How to Avoid a Soggy Bottom Crust
A soggy crust can ruin an otherwise perfect pie, but it’s easy to prevent with a few smart moves. First, consider pre-baking the crust (also called blind baking). Line your pie dish with the crust, cover it with parchment paper, and weigh it down with dry beans or pie weights. Bake for about 10 minutes at 375°F before adding the filling.
Another essential tip? Make sure to drain the canned peaches thoroughly. Excess juice is often the culprit behind soggy pies. For an extra layer of protection, sprinkle a little flour or cornstarch on the crust before adding the filling—it absorbs moisture and keeps the crust crispy.
If you’re a fan of experimenting with pie-making, you might enjoy trying different crust techniques or flavor combinations. For inspiration, check out the Ninja Creami Recipes for creative ideas to complement your pie-making skills!
Secrets to a Flaky Pie Crust
Want a crust so flaky it melts in your mouth? Start with cold butter or shortening—it’s the key to creating those delicious layers. If you’re using a store-bought crust, don’t skip the egg wash. Brushing the crust with a mix of beaten egg and water before baking adds that golden, bakery-style finish.
With these tricks, your canned peach pie will be as perfect as it is easy to make.
Part 5: Serving and Storing Your Peach Pie
How to Serve Peach Pie Like a Pro
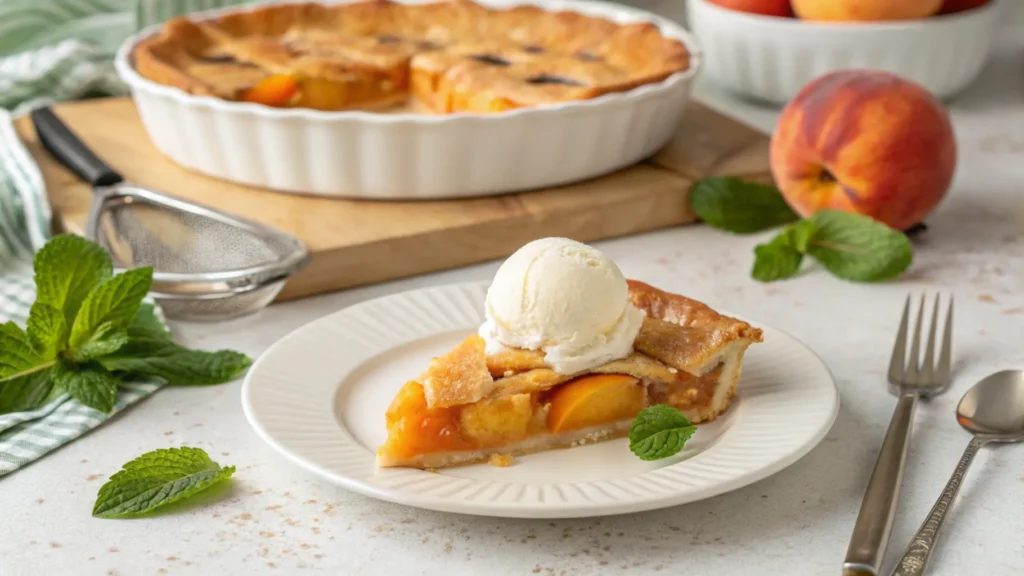
Presentation is everything, and serving your canned peach pie warm is the ultimate way to wow your guests. Simply heat it in the oven at 350°F for about 10 minutes to refresh the flavors and aroma. Add a scoop of vanilla ice cream or a dollop of whipped cream for that classic pairing. Want to impress even more? Sprinkle crushed pecans or drizzle caramel sauce on top.
For more crowd-pleasing dessert ideas, check out the Carrot Cake Cupcakes Recipe for a complementary sweet treat!
Proper Storage for Freshness
If you’re lucky enough to have leftovers, don’t let them go to waste! Cover your pie with plastic wrap or foil and store it in the fridge for up to four days. For longer storage, freeze individual slices wrapped in plastic wrap and foil. Reheat frozen slices in the oven at 375°F to bring them back to life.
Part 6: Common Mistakes to Avoid When Baking Peach Pie
Over-Handling the Crust
One of the biggest pitfalls in pie-making is overworking the dough. This can result in a tough crust that’s more chew than flaky. Whether you’re making your own or using store-bought, keep it simple—roll it out once and avoid excessive handling. If the dough starts sticking, a little flour goes a long way.
For store-bought crusts, let them sit out for 5-10 minutes to make them more pliable. This prevents cracks when fitting them into the pie dish.
Skipping the Thickener
Another common mistake is forgetting to add a thickener to the filling. Without flour or cornstarch, the canned peach pie can turn into a runny mess that’s impossible to slice cleanly. Always mix in the recommended amount of thickener, and be sure to coat your peaches evenly.
If you want to avoid these rookie errors and explore other desserts, take a look at the Mastering Seafood Pot Pie Guide for inspiration on savory pies!
Not Baking Long Enough
The perfect pie crust should be golden brown, but many bakers pull their pie out too soon. Be patient—let the crust bake until it’s visibly golden and the filling bubbles at the edges. If the edges brown too quickly, cover them with aluminum foil or a pie shield.
Avoiding these mistakes will take your peach pie game to the next level!
Part 7: FAQs About Making Peach Pie with Canned Peaches
Can You Use Canned Peaches Instead of Fresh Peaches?
Absolutely! Canned peaches are a fantastic alternative to fresh peaches, especially when they’re out of season. They’re pre-peeled, sliced, and often packed in syrup or juice, making them a convenient and consistent option for pie-making. Plus, they save you time since there’s no need for peeling or prepping. Just be sure to drain them well to avoid excess liquid in your pie.
Which Method Is Usually Used to Make Pie Filling from Canned Peaches?
The typical method for making pie filling with canned peaches is super straightforward:
- Drain the canned peaches to remove the liquid.
- Toss the peaches in a mixture of sugar, flour or cornstarch (to thicken), and spices like cinnamon and nutmeg.
- Mix everything gently to coat the peaches evenly.
- If desired, add a splash of vanilla or almond extract for extra flavor. This method creates a sweet, flavorful filling perfect for a peach pie.
How Do You Thicken Canned Fruit for Pie Filling?
To thicken canned fruit for pie filling, use a thickening agent like flour, cornstarch, or tapioca starch. These work by absorbing the excess moisture and turning it into a thick, luscious filling. Typically, you’ll need about 2 tablespoons of flour or 1-1½ tablespoons of cornstarch per pie. Mix the thickener directly with the sugar and spices before combining it with the fruit. This ensures even distribution and avoids clumps.
What’s the Difference Between a Peach Pie and a Peach Cobbler?
The key difference lies in the crust. A peach pie typically features a flaky, buttery crust on the bottom, with an optional lattice or full crust on top. It’s structured and sliceable, making it ideal for neat servings.
On the other hand, a peach cobbler has no bottom crust. Instead, the peaches are topped with a biscuit-like dough or batter, creating a more rustic, spoonable dessert. Cobblers are easier to assemble and often have a less formal presentation than pies. Both are delicious, but the choice depends on your mood and how much effort you want to put in! 🍑
For other creative pie recipes, you might enjoy the Chicken Pot Pie Crescent Rolls for a savory twist on classic comfort food.
Part 8: Final Thoughts: Your Perfect Canned Peach Pie Awaits
There you have it—the ultimate guide to how to make the easiest canned peach pie at home. Whether you’re a pie novice or a seasoned pro looking for a shortcut, canned peaches make this dessert a breeze. With the right ingredients, tips to avoid soggy crusts, and a little love, you’ll whip up a pie that’s as tasty as it is effortless.
Don’t forget to make it your own—add a sprinkle of sugar to the crust, try almond extract for a unique twist, or top it with a big scoop of ice cream. It’s all about creating a dessert that brings a smile to your face (and the faces of everyone lucky enough to get a slice!).
So, preheat that oven, grab your favorite pie dish, and get ready to fill your kitchen with the sweet aroma of peach pie. Trust me, you won’t regret it!
Conclusion
Now that you know how to make the easiest canned peach pie at home, it’s time to bring your skills to life. From quick preparation to easy baking, this recipe ensures that anyone can whip up a delicious dessert with minimal effort.
Whether it’s for a family gathering, a potluck, or a weeknight treat, this peach pie is sure to impress. Additionally, the step-by-step tips and creative flavor ideas make it versatile enough for any occasion. So, preheat that oven and get ready to fill your home with the warm, inviting aroma of peach pie. Happy baking! 🍑