

Creating a Cookie Monster cake is not only a fun activity but also a fantastic way to bring smiles to both kids and adults alike. This delightful cake, inspired by the lovable Sesame Street character, is a perfect choice for birthdays, themed parties, or simply indulging your inner baker. In this article, we’ll walk you through how to make a Cookie Monster cake in 5 easy steps. From baking the perfect layers to mastering the blue frosting and adding those iconic candy eyes, we’ve got every detail covered. Let’s dive right into the first part of your cake-making adventure!
Table of Contents
Introduction to How To Make A Cookie Monster Cake In 5 Easy Steps
What is a Cookie Monster Cake?
A Cookie Monster cake is a playful, whimsical dessert that brings the charm of Sesame Street’s most beloved cookie-eating monster to life. Typically decorated with bright blue frosting to mimic Cookie Monster’s fur, candy eyes, and real cookies, this cake is as much a feast for the eyes as it is for the taste buds. Whether you’re a seasoned baker or just starting, the beauty of this cake lies in its simplicity and the joy it brings.
Why Choose This Cake for Celebrations?
Celebrations deserve cakes that steal the show, and the Cookie Monster cake does just that! Its eye-catching design is bound to be the centerpiece of any party. Plus, it’s customizable—you can use chocolate, vanilla, or even a funfetti cake base, depending on your preference. Perfect for kids’ birthdays, Sesame Street-themed parties, or even a smash cake for a baby’s first birthday, it’s guaranteed to delight both young and old. By following these five simple steps, you’ll create a masterpiece that’s as fun to make as it is to eat!
Gather Ingredients and Tools for Your Cookie Monster Cake
Essential Ingredients for the Cake Base
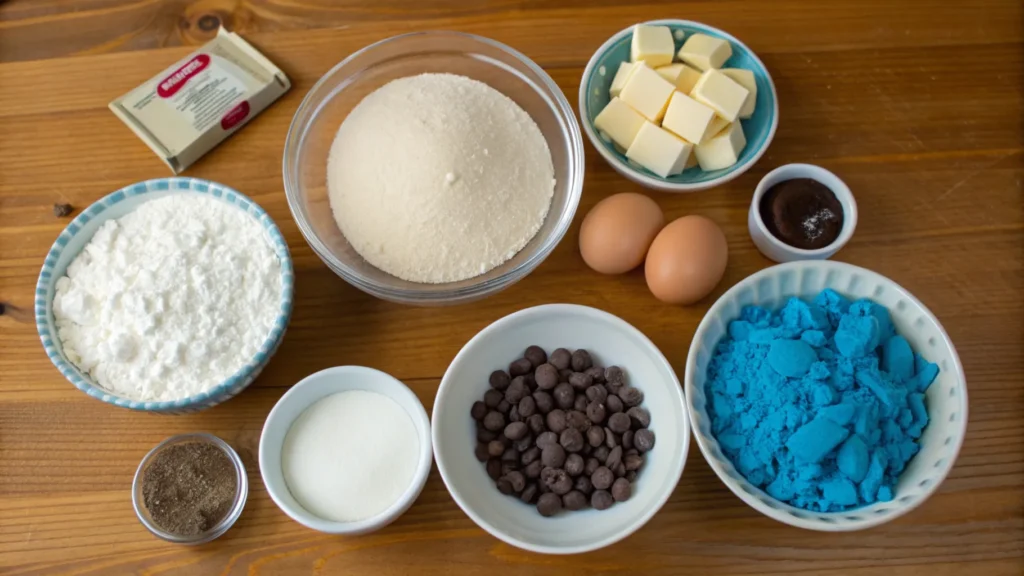
Before starting, gather all the essential ingredients for your Cookie Monster cake. You’ll need basic baking staples like all-purpose flour, granulated sugar, unsalted butter, eggs, and baking powder. For a richer flavor, don’t forget vanilla extract and a pinch of salt. Want to add some Cookie Monster flair? Toss in a handful of mini chocolate chips to give the cake that extra cookie crunch.
For the blue frosting, stock up on powdered sugar, heavy cream, blue food coloring, and butter. The frosting is key to creating Cookie Monster’s signature fuzzy fur, so don’t skimp on these ingredients!
Necessary Frosting and Decorations
Here’s where the magic happens—decorations! You’ll need blue gel food coloring to achieve that vibrant Cookie Monster shade. For the eyes, use large candy eyeballs or make your own with white fondant and black edible marker. Don’t forget to grab some chocolate chip cookies for Cookie Monster’s favorite snack. You’ll also want a piping bag fitted with a grass frosting tip to create the textured fur.
Baking Tools Checklist
Having the right tools can make your baking experience smooth and fun. You’ll need two or three round cake pans (depending on the size you’re aiming for), a stand or hand mixer, and a cooling rack. A cake turntable will help you frost evenly, and a palette knife will smooth the frosting. Don’t forget a cake board for easy handling and display. With these tools, you’re set for a seamless baking process!
Step 1 – Bake Cake Layers for Your Cookie Monster Creation
Preparing the Cake Batter
To kick off how to make a Cookie Monster cake in 5 easy steps, start with a foolproof cake batter. Preheat your oven to 350°F (175°C) and grease your cake pans. In a large bowl, cream together the butter and sugar until fluffy. Add eggs one at a time, beating well after each. Mix in the vanilla extract.
In another bowl, whisk together the flour, baking powder, and salt. Gradually add the dry mixture to the wet ingredients, alternating with milk, until fully combined. If you’re adding chocolate chips, fold them in gently.
Tips for Baking Evenly Cooked Cake Layers
Pour the batter evenly into the prepared pans, using a kitchen scale if necessary for precise layers. Lightly tap the pans on the counter to release any air bubbles. Bake for 25–30 minutes, or until a toothpick inserted in the center comes out clean.
Cooling and Prepping for Assembly
Once baked, let the cakes cool in the pans for about 10 minutes before transferring them to a wire rack. This prevents sticking and ensures even cooling. For a smooth finish, level the tops of the cakes with a serrated knife or cake leveler. Cool completely before moving to the next step—frosting!
With your cake layers ready, you’re one step closer to creating a showstopping Cookie Monster cake that’s sure to impress.
Step 2 – Prepare Blue Frosting for the Cookie Monster Look
How to Achieve the Perfect Cookie Monster Blue
For a stunning Cookie Monster cake, the frosting is key. To start, beat unsalted butter until light and fluffy, then gradually add powdered sugar. Mix in a splash of vanilla extract for added flavor. To get that iconic blue hue, use gel food coloring—it’s more vibrant than liquid and won’t water down the frosting. Add small amounts until the shade matches Cookie Monster’s fur.
Techniques for Smooth and Even Frosting Application
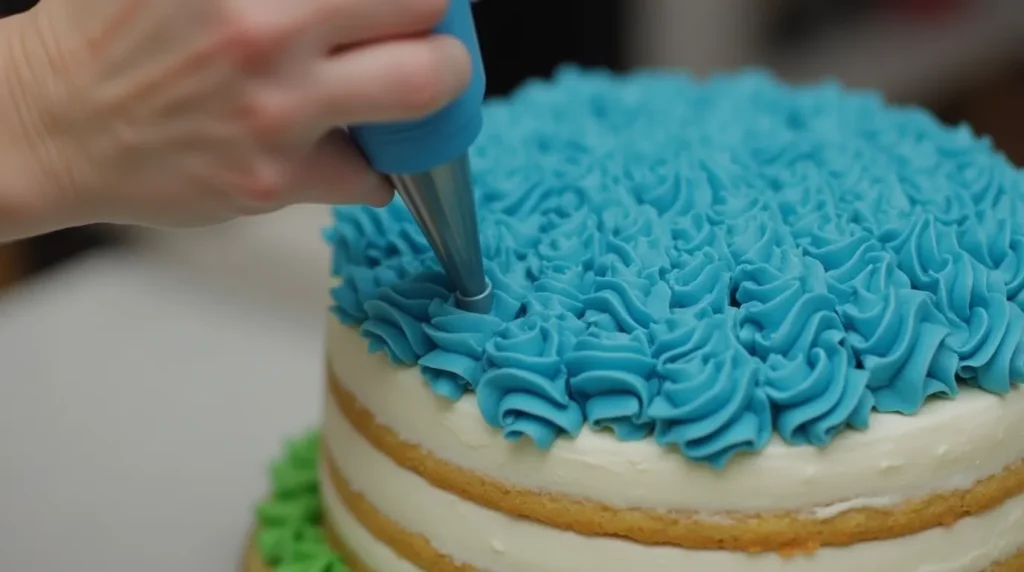
Once your frosting is ready, it’s time to coat the cake. Begin with a thin crumb coat to lock in loose crumbs, then refrigerate for 15–20 minutes. Afterward, apply a generous layer of frosting using a palette knife or an offset spatula. For a textured fur effect, use a piping bag fitted with a grass tip, piping in short bursts all over the cake. This step will bring Cookie Monster to life!
Step 3 – Add the Iconic Cookie Monster Face
Making and Positioning Candy Eyes
A Cookie Monster cake isn’t complete without his googly eyes! If you’ve got candy eyes, simply press them gently onto the frosted cake. Alternatively, make your own using white fondant rolled into small balls. Use a black edible marker or a dot of melted chocolate for the pupils. Position the eyes slightly askew for a playful, classic look.
Piping the Mouth and Adding Cookie Details
For the mouth, pipe a wide black oval in the middle of the cake using a round tip and black gel frosting. To make it extra fun, press a half cookie into the mouth as though Cookie Monster is munching on his favorite snack. Scatter a few mini cookies around the base of the cake for added flair.
Pro Tip: Use fresh, soft cookies for decoration—they’re easier to position and won’t crumble.
For more delicious recipes, check out our article on Carrot Cake Cupcakes – A Sweet and Spiced Treat.
Step 4 – Assembling the Cake Layers
Stacking Layers with Filling
Now that your cake layers and frosting are ready, it’s time to stack the cake. Place the first layer on a sturdy cake board or plate. Spread an even layer of frosting on top, ensuring you reach the edges. If you’re feeling adventurous, add a layer of chocolate ganache or crushed cookies for extra texture and flavor. Gently place the second layer on top, pressing lightly to secure. Repeat the process if you have a third layer.
Ensuring Stability for Easy Frosting
To keep the cake stable, insert a few wooden dowels or straws through the layers. This step is crucial, especially if you’re working with taller cakes. Before moving on, refrigerate the cake for about 20 minutes. Chilling firms up the frosting, making it easier to apply the final layer without the cake shifting. By following these steps, you’re well on your way to mastering how to make a Cookie Monster cake in 5 easy steps.
Step 5 – Decorating the Final Cake
Creating a Fluffy Fur Effect with Frosting
The final decorating step brings Cookie Monster to life! Using a piping bag fitted with a grass tip, pipe short bursts of blue frosting all over the cake, working from the bottom up. This technique creates the fluffy, textured look that mimics Cookie Monster’s fur. Be sure to rotate the cake as you go to cover every angle evenly. If you spot any gaps, simply pipe over them.
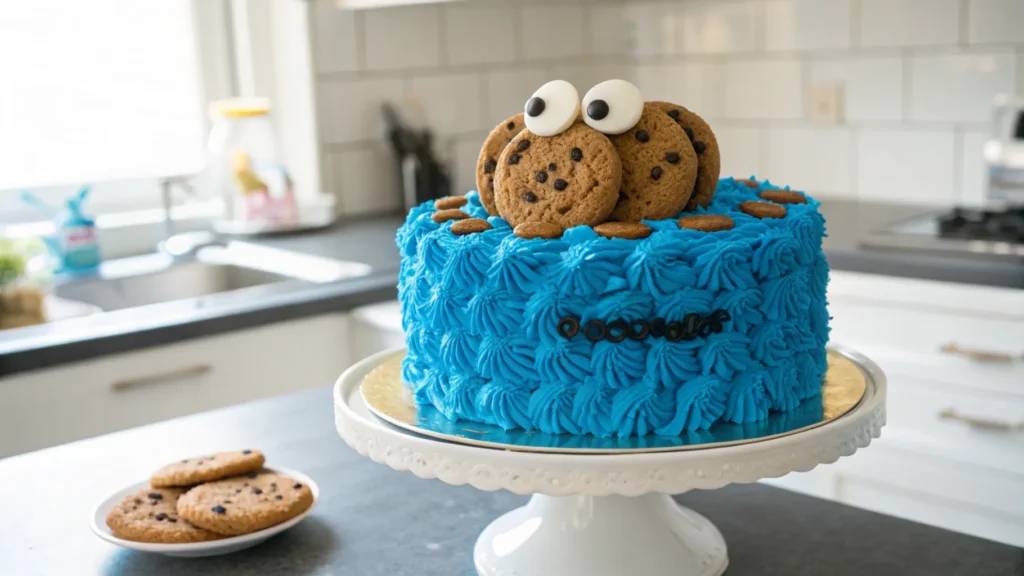
Adding Real Cookies for a Fun Touch
To complete the look, add real cookies as props. Press a large chocolate chip cookie into Cookie Monster’s “mouth” to make it appear as if he’s mid-snack. Arrange mini cookies around the base of the cake for an extra playful vibe. You can even crumble a few cookies on the top for a fun, messy touch.
This final step ties everything together, making your cake a true showstopper. Whether it’s for a birthday party or a themed celebration, your Cookie Monster cake will be the star of the dessert table!
Tips and Tricks for Success
Common Mistakes to Avoid
Even with the best intentions, mistakes can happen when making a Cookie Monster cake. One common error is not chilling the cake layers properly before stacking. Warm layers can cause the frosting to slide, making the cake unstable. Another pitfall is using too much food coloring. While you want a vibrant blue, adding too much gel can alter the taste and texture of the frosting.
Additionally, overfilling the cake with frosting or heavy decorations can lead to a toppling disaster. To prevent this, always keep the decorations light and balanced. By avoiding these mistakes, you’ll keep the process smooth and stress-free.
How to Fix Decoration Errors
Mistakes during decorating? No worries! If your frosting fur looks uneven, simply pipe over the gaps to blend the texture. Got a smudged eye or mouth? Gently remove it with a spatula, smooth the surface, and try again. And if your cake feels wobbly, refrigerate it for 10–15 minutes to let everything firm up.
These quick fixes ensure your cake still looks stunning, making the process of how to make a Cookie Monster cake in 5 easy steps enjoyable from start to finish.
FAQs About Cookie Monster Cakes
What Flavor Is Cookie Monster Cake?
A Cookie Monster cake typically features classic flavors like vanilla, chocolate, or funfetti. These flavors pair well with the sweet blue buttercream frosting and the signature chocolate chip cookies used for decoration. Some bakers also incorporate crushed cookies into the cake batter or frosting to add an extra cookie flavor.
Why Did Cookie Monster Stop Eating Cookies?
Contrary to popular belief, Cookie Monster never truly stopped eating cookies. However, in the mid-2000s, Sesame Street introduced the idea of “a cookie is a sometimes food” to promote healthy eating habits. Cookie Monster began eating a variety of foods, like fruits and vegetables, to teach children about balanced diets. Despite this, cookies remain his favorite treat!
What Piping Tip for Cookie Monster?
To create Cookie Monster’s fluffy fur, use a grass piping tip, often labeled as a #233 or #234 tip. This specialized tip allows you to pipe short, textured bursts of frosting that resemble the character’s shaggy blue fur. It’s essential for achieving an authentic Cookie Monster look.
What Kind of Cookies Does Cookie Monster Eat?
Cookie Monster famously loves chocolate chip cookies, which are often depicted in his skits. However, he’s not picky—he’ll happily devour oatmeal, sugar, or even imaginary cookies! For a Cookie Monster cake, using real chocolate chip cookies adds a fun and authentic touch to the design.
PConclusion and Final Thoughts
Recap of the 5 Easy Steps
And there you have it—how to make a Cookie Monster cake in 5 easy steps! From baking perfect layers to adding that playful Cookie Monster face, each step brings you closer to a showstopping dessert. This cake is not only delicious but also a fun project for all skill levels.
Encouragement for First-Time Bakers
If this is your first time decorating a character cake, don’t worry! Even if it’s not perfect, the joy it brings will outweigh any tiny imperfections. So, grab your tools, and let your creativity shine!
Additional Recipe Inspiration
Explore More Fun Cake Ideas
If you enjoyed making this Cookie Monster cake, why not try other themed cakes? For a colorful twist, check out Ultimate Barbie Cake. You can also explore fun cookie recipes like Cranberry Oatmeal Cookies, perfect for pairing with your cake.
Creating themed desserts is a delightful way to celebrate special moments and unleash your inner baker!